Here’s a nifty little lighting effect that we can create in Adobe Photoshop using the Lighting Effects filter. It’s a really simple way to give a flat graphic some flare!
First, go to Filter > Render > Lighting Effects. You should be immediately greeted with a bunch of confusing settings and a thumbnail of your image:
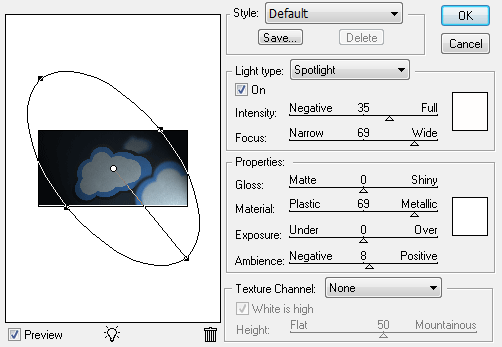
This is simply the default lighting effects settings. We’re not going to use them, but I’d like to quickly explain what a few of the different settings do:
From any of the 4 handles, the light can be rotated. It’s also important to know that the handle with the line extending towards the center is the source of the light, meaning that the light will appear to come from that direction.
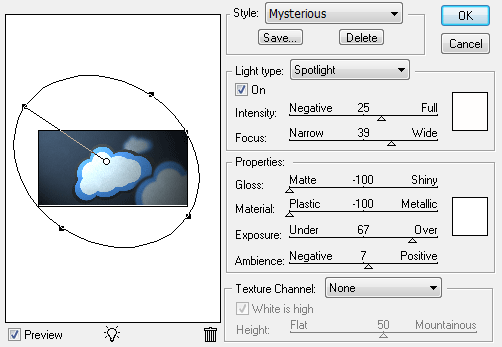
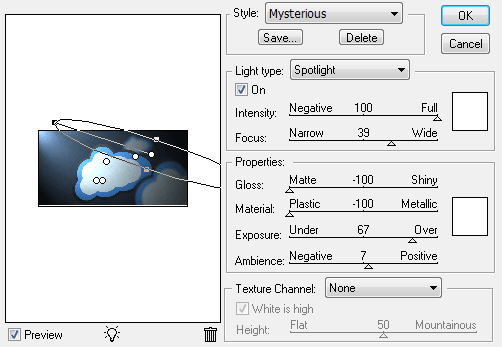
With all this in mind, reposition your first light source and settings to reflect what is shown in the diagram below:
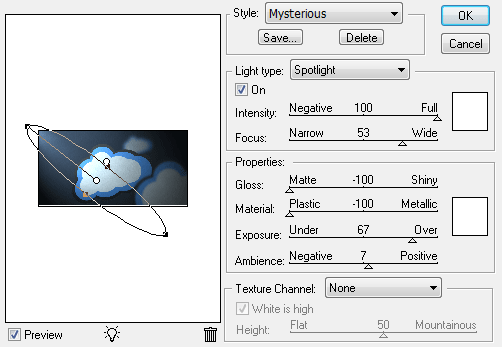
When you create a light to double up with, you may want to decrease the intensity and focus by pretty large amounts, as we’re simply trying to increase the overall intensity of the first beam. We don’t want to give the light source an overly hard appearance.

What We’re Making
In this tutorial, I’m going to show you a nice and easy way to use the Lighting Effects filter in Photoshop to add a mysterious ambiance to almost any graphic. To see the effect in action, hover over the image below:Getting Started
This effect typically works best on graphics that are a bit less saturated and bright. You’re welcome to use original graphic to try this effect out on, otherwise, we suggest you do the following if you’re working with a bright graphic with vibrant colors.- Go to Image > Adjustments > Hue/Saturation
- Decrease the brightness and saturation of your graphic until you feel like it’s more fitting for this effect.
Single Layer Graphics Only!
Before continuing, please make sure that your graphic is contained on one layer only! The method we will be teaching in this tutorial requires that you are working with ONLY 1 layer. To merge all of your layers into one, select all of your layers in the layers palette, and go to Layers > Merge Layers (Ctrl + E).Another Easy Way to Merge Layers
CJ.H pointed out another really great way to merge layers for our purposes here without getting rid of our other layer data. By using the shortcut Ctrl + Alt + Shift + E, we can merge all layers below our currently selected layer, and place the merged copy on top! Simple, and very effective! Thanks CJ.H!Render the Lighting Effect
This effect essentially centers around the lighting effects filter. If you’ve ever worked with the filter before, you may already have a few guesses as to how to accomplish this. However, you have nothing to worry about if you have no experience with this filter, because we’re going to go through the process, step by step.First, go to Filter > Render > Lighting Effects. You should be immediately greeted with a bunch of confusing settings and a thumbnail of your image:

This is simply the default lighting effects settings. We’re not going to use them, but I’d like to quickly explain what a few of the different settings do:
Style – From here, you can select one of many preset styles that come with Photoshop, or use the “Default” lighting setup (shown above).
Light Type – There are 3 different lighting types, including Spotlight, Directional, and Omni. From here, one can control the color of the light (on the right), intensity (brightness), and focus (how hard or soft the light is).
Properties – From the properties settings, a user can adjust the properties of all lights, such as Gloss (how reflective the surface seems), type of material (should it appear more like a plastic or metallic surface), exposure, and ambient light (which the color of can be changed if desired on the right).

You’ll also notice this icon underneath your preview area. To add a new light to the scene, drag and drop from this icon into your image area. To remove a light, drag it from the image area into the trash icon to the right.
Properties – From the properties settings, a user can adjust the properties of all lights, such as Gloss (how reflective the surface seems), type of material (should it appear more like a plastic or metallic surface), exposure, and ambient light (which the color of can be changed if desired on the right).
You’ll also notice this icon underneath your preview area. To add a new light to the scene, drag and drop from this icon into your image area. To remove a light, drag it from the image area into the trash icon to the right.
Configure the First Light
Be sure your Light Type is set to Spotlight. There are 4 handles surrounding the center of the light: The Handle with the line extending towards the center along with the handle on the opposite side determine the length of the light. The other two handles determine the width. Additionally, the center of the light can be dragged to reposition the light.From any of the 4 handles, the light can be rotated. It’s also important to know that the handle with the line extending towards the center is the source of the light, meaning that the light will appear to come from that direction.
With all this in mind, reposition your first light source and settings to reflect what is shown in the diagram below:

Configure the Second Light
Add a new light into the image (as mentioned earlier, drag a new light from the lightbulb icon into the image area), and configure it to look like this. We want it to appear as if it’s a single ray coming in, separate from our large, first light source, so we want it to be thin, and coming in at a slightly different angle.
Switch Between Lights
You may have noticed that as soon as a new light was created, the settings and handles for your other light disappeared. They can STILL be editied! To switch between lights, just click the white center of the light.Doubling Up
Often times, you’ll need to double up lights in order to create bright streaks of light streaming in over your graphic. To do this, simply add an additional light source that’s approximately the same width and length, and going in about the same direction as the light you’re trying to increase the intensity of.When you create a light to double up with, you may want to decrease the intensity and focus by pretty large amounts, as we’re simply trying to increase the overall intensity of the first beam. We don’t want to give the light source an overly hard appearance.

Add More Streams of Light
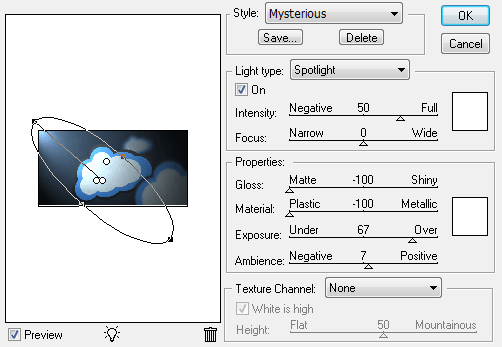
Add another stream of light, coming from a different angle, in a different area of the image. It should appear as if the streams are being separated by an object in the way, such as light pouring through bars of a jail cell, or something of the like.
Finished!
Just Press OK to apply your lighting effects filter, and you’re all set to go. If things don’t turn out looking great, just undo the filter, and go back to Filter > Render > Lighting Effects. It will keep the setup previously used, so you shouldn’t have trouble making any modifications!

